


DIY Fibreglass Pool Installation Process from Start To Finish
How can you spot the difference between a Complete DIY installed fibreglass pool kit and a pool bought and installed through a traditional pool builder? Aside from the thousands of dollars you’ll save, you won’t be able to tell. Our fibreglass pool installation kits come with premium Australian made pool shells and equipment.
We have delighted customers across Australia who’ve taken the DIY fibreglass pool installation route. From skilled tradespeople to office workers who might struggle to identify a hammer, anyone can successfully install a fibreglass pool. You can tackle the installation as an Owner Builder, hire a local licensed installer (we can usually put you in touch with an installer), or mix both approaches.
Our robust DIY support system makes fibreglass pool installation straightforward and economical. Click here to learn more.
.webp?width=700&height=350&name=Pool-Installation-1-Copy.jpg%20(1).webp)
Access For Equipment
Between 2.5m and 3m down the side of your house is ideal for fibreglass pool installation. However, 900mm is the minimum access width for excavation equipment access.
Mark Out Your Pool
Grab some builder’s string line from Bunnings and mark out the length and width of the fibreglass pool you want. This is a quick way to check if this size pool will fit, and to see how your pool will complement the surrounding area. This will give you an idea of which size pools you can consider.
While the most popular fibreglass pools in Australia are 7m and 8m models, you can have bundles of family fun in any size pool.
Find Your In Ground Services
Get onto Before You Dig Australia (www.byda.com.au) for free sewer, electrical and water services diagrams. Not connected to sewer? Make sure you know where your septic tanks are located.
Chat With Council or a Building Certifier
Your fibreglass pool must have a minimum distance from boundary fences, your house and in-ground services. This can affect the size of the pool your council will approve. To save headaches, it is best to discover this early in your pool-buying journey.

The set-up, environment and use of a pool are different for every pool owner. We won’t send you a generic, one-size-fits-all quote and hope for the best. Instead, we ensure your pool equipment works for how YOU will set up and use your pool. Our short phone call prevents you from having huge ongoing maintenance headaches and high running costs.
Here are just some of the things we’ll cover on the call:
- The location of your equipment – to ensure your pump is strong enough for optimal water circulation, and reduce your power bill.
- The number of people using the pool – to ensure your equipment keeps your pool sparkling, without continuously paying for chemicals and replacement parts (saving you hundreds of dollars a year).
- The surrounding environment, water supply and sewer/septic location – to determine the type of equipment your local council will allow you to install, and the amount of maintenance time your pool will need.
Engineering Details – We provide you with the engineering and Australian Standards compliance documents required for your council permit application.
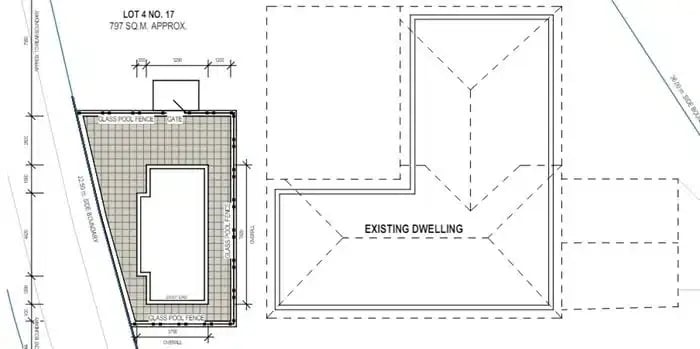
Site Plan – You will need a site plan to show where your fibreglass pool will be located, in relation to your house, boundary fences and in-ground services (such as sewer lines, and easements). Contact us – we can put you in touch with a provider who charges less than $300 for a site plan – or you can source a draftsman.
Council Permit – You can submit your permit application directly to your local council, which can take up to 12 weeks for approval. Or for a fee, use a Private Certifier. They will generally approve your fibreglass pool permit much faster (as little as 2 weeks). We can suggest certifiers to use. Not sure? Give us a call and we will explain the options to you.
The most common trades required for pool installations are:
- Temporary pool fencing – this is required while your pool is being installed and has more than 300mm of water in it.
- Electrician – to install power points for your equipment station; and to earth your concrete bond beam or any other fixtures within 1.25m of the pool edge.
- Plumber – to connect a waste line from your sand filter to your sewer. This is not required if you choose a cartridge filter.
- Excavator – to excavate the hole for your fibreglass pool installation. We provide you with a dimensioned dig sheet to give to your contractor.
- Crane hire – to lift your fibreglass pool shell into place.
- Concreter – to install your bond beam.
- Pool fencing supplier – to install Australian Standard compliant pool fencing.

If you are Owner Building, you will need to spend a few hours online getting your Owner Builder permit. Anyone can do it and it’s not difficult. We can suggest an online course provider. We can also put you in touch with an installer who works with Owner Builders (supervising excavation, bedding, backfill and equipment plumb-up). Prefer your fibreglass pool installation to be more hands-off? We can put you in touch with a local installer who can manage the entire fibreglass pool installation.
We provide the excavation dimensions (dig sheet) needed for your fibreglass pool installation, as part of your DIY pool kit. You will need an excavator to excavate a hole in the shape of your pool. A bobcat will then generally remove the soil to a waiting truck. If your access to where the pool is going is narrower than 3m, you will need to use smaller equipment, which will add to the excavation time and cost.
Make sure to check that removing the soil from site is included in the excavation price. Try www.fillwanted.com.au to see if there is a site nearby to take your soil for free.
Do not excavate your pool more than 2 weeks before your planned installation date. This helps to prevent re-excavation due to excessive rain or unstable soil.

To ensure your DIY pool is level and has adequate groundwater drainage, your fibreglass pool shell will need to rest on a layer of bedding material. This is usually a porous material such as crusher dust, or an aggregate material no larger than 7mm. We will provide you with a copy of the Australian Standards 1838:2021 for fibreglass pool installation as part of your DIY pool kit. These Standards are easy to understand and follow during the installation process . The bedding layer does not need to be compacted and you won’t need a concrete slab under your pool.
Watch our How To videos about the type of bedding materials you can use, and how to level the bedding layer.
Now it gets exciting. We will arrange the delivery of your DIY fibreglass pool kit to your front kerb. Click here to see where we deliver across Australia. You can have your fibreglass pool placed onto your front verge for installation at a later date. Or (if needed), you can organise a crane to lift your fibreglass pool shell over your house and lower it into place. If you have powerlines and/or a two-storey house in the way, it is not a problem – arrange a bigger crane! The cost to hire a crane is usually between $500 and $1,500.
If you have a challenging site and are having trouble finding a crane company, give us a call. We can usually point you in the right direction. If your pool delivery needs to be delayed, no problem. You won’t end up with a pool on your driveway for months. We can store the pool for you or delay its manufacture date.

Once your fibreglass pool shell is resting in place, it’s time to plumb up. The return jets (sometimes called eyeballs), skimmer box and any other plumbing provisions (such as spa jets, deck jets and heating), will need to be connected with plastic Class 9 PVC plumbing and two-part pressure glue. You generally use 50mm plumbing from the skimmer box to the pump, all other connections are 40mm. We recommend pressure testing all your plumbing connections for leaks before backfilling.
To assist with managing groundwater levels, you’ll need to install a 100mm PVC standpipe in conjunction with a hydrostatic valve in the floor of your DIY fibreglass pool.
Watch previews of our DIY Pool videos showing the installation of the fittings and hydrostatic valve
Live in WA? You don’t need to install a hydrostatic valve.

Backfilling is a nice way to say “fill in the hole” around your fibreglass pool shell. To ensure longevity, your will need to backfill around your pool using cement-stabilised crusher dust. This prevents the backfill from being eroded by groundwater or future pool movement. You will need to slowly fill your pool with water during this process. This ensures that once full, it is level and the pool walls straight. You’ll need to install temporary pool fencing while your pool is being filled and has more than 300mm of water in it.
In this image, the plumbing on the left side of the pool is for the water feature, pump, filter and chlorinator.
Watch our DIY video showing you how to backfill and level a fibreglass pool

You will need to lay a beam of concrete around your entire DIY fibreglass pool. This concrete has to be reinforced with steel bar and/or mesh and physically tied to the underside of the pool edge (called coping) to prevent separation. Concrete is worked under the coping and grips the steel bar as it dries for strength. The coping is 200mm wide and provides a structurally strong foundation for your DIY fibreglass pool edge tiling (called coping tiling). If your tiles are longer than 300mm, you can increase the width of your bond beam to the size of your tiles.
Watch our DIY pool videos showing you how to install a bond beam
*A BOND BEAM IS NOT REQUIRED IN WESTERN AUSTRALIA
Your bond beam will reach 90% of its final strength within 7 days, which means you can then lay your coping tiles. The next step is to install and test your pool equipment. Once this is up and running, you have completed your basic fibreglass pool installation.
The last pieces of the puzzle – pool fencing, cleaning and balancing the water, landscaping and further paving – can be completed by your installer. Or you can arrange these trades yourself to save more money. Our water features are designed to neatly house your pump, filter and chlorinator as seen in this image.
All you need to do now is tell the kids to get their bathers on!
Most pool owners surround their fibreglass pool with paving or poured concrete (you can use exposed aggregate or honed). This also enables you to install permanent pool fencing that is compliant with Australian Standards. Your pool fence installation company will be able to guide you on the requirements.

Once your permanent pool fencing has been installed, you need to arrange for your fibreglass pool to be inspected and certified as compliant. Your local council or your private certifier will sign off on this. Landscaping doesn’t need to be completed for certification. You have plenty of time to work out your landscaping plan to make your pool the envy of the street.

You’re done! It’s time to start creating awesome pool-time memories with friends and family and staying cool. Nope, it’s not weird to start wishing for belting hot weather once you have a pool!
1. What Size Is Possible
Access For Equipment
Between 2.5m and 3m down the side of your house is ideal for fibreglass pool installation. However, 900mm is the minimum access width for excavation equipment access.
Mark Out Your Pool
Grab some builder’s string line from Bunnings and mark out the length and width of the fibreglass pool you want. This is a quick way to check if this size pool will fit, and to see how your pool will complement the surrounding area. This will give you an idea of which size pools you can consider.
While the most popular fibreglass pools in Australia are 7m and 8m models, you can have bundles of family fun in any size pool.
Find Your In Ground Services
Get onto Before You Dig Australia (www.byda.com.au) for free sewer, electrical and water services diagrams. Not connected to sewer? Make sure you know where your septic tanks are located.
Chat With Council or a Building Certifier
Your fibreglass pool must have a minimum distance from boundary fences, your house and in-ground services. This can affect the size of the pool your council will approve. To save headaches, it is best to discover this early in your pool-buying journey.
2. Choose Your Pool Kit
The set-up, environment and use of a pool are different for every pool owner. We won’t send you a generic, one-size-fits-all quote and hope for the best. Instead, we ensure your pool equipment works for how YOU will set up and use your pool. Our short phone call prevents you from having huge ongoing maintenance headaches and high running costs.
Here are just some of the things we’ll cover on the call:
- The location of your equipment – to ensure your pump is strong enough for optimal water circulation, and reduce your power bill.
- The number of people using the pool – to ensure your equipment keeps your pool sparkling, without continuously paying for chemicals and replacement parts (saving you hundreds of dollars a year).
- The surrounding environment, water supply and sewer/septic location – to determine the type of equipment your local council will allow you to install, and the amount of maintenance time your pool will need.
3. Council Approval and Quotes
Engineering Details – We provide you with the engineering and Australian Standards compliance documents required for your council permit application.
Site Plan – You will need a site plan to show where your fibreglass pool will be located, in relation to your house, boundary fences and in-ground services (such as sewer lines, and easements). Contact us – we can put you in touch with a provider who charges less than $300 for a site plan – or you can source a draftsman.
Council Permit – You can submit your permit application directly to your local council, which can take up to 12 weeks for approval. Or for a fee, use a Private Certifier. They will generally approve your fibreglass pool permit much faster (as little as 2 weeks). We can suggest certifiers to use. Not sure? Give us a call and we will explain the options to you.
The most common trades required for pool installations are:
- Temporary pool fencing – this is required while your pool is being installed and has more than 300mm of water in it.
- Electrician – to install power points for your equipment station; and to earth your concrete bond beam or any other fixtures within 1.25m of the pool edge.
- Plumber – to connect a waste line from your sand filter to your sewer. This is not required if you choose a cartridge filter.
- Excavator – to excavate the hole for your fibreglass pool installation. We provide you with a dimensioned dig sheet to give to your contractor.
- Crane hire – to lift your fibreglass pool shell into place.
- Concreter – to install your bond beam.
- Pool fencing supplier – to install Australian Standard compliant pool fencing.
4. Installation Options
If you are Owner Building, you will need to spend a few hours online getting your Owner Builder permit. Anyone can do it and it’s not difficult. We can suggest an online course provider. We can also put you in touch with an installer who works with Owner Builders (supervising excavation, bedding, backfill and equipment plumb-up). Prefer your fibreglass pool installation to be more hands-off? We can put you in touch with a local installer who can manage the entire fibreglass pool installation.
5. Excavation
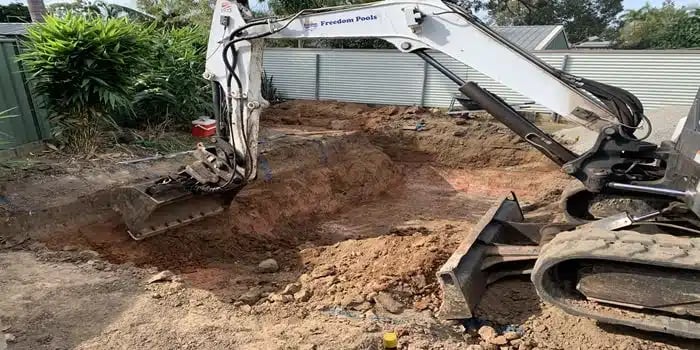
We provide the excavation dimensions (dig sheet) needed for your fibreglass pool installation, as part of your DIY pool kit. You will need an excavator to excavate a hole in the shape of your pool. A bobcat will then generally remove the soil to a waiting truck. If your access to where the pool is going is narrower than 3m, you will need to use smaller equipment, which will add to the excavation time and cost.
Make sure to check that removing the soil from site is included in the excavation price. Try www.fillwanted.com.au to see if there is a site nearby to take your soil for free.
Do not excavate your pool more than 2 weeks before your planned installation date. This helps to prevent re-excavation due to excessive rain or unstable soil.
6. Bedding
To ensure your DIY pool is level and has adequate groundwater drainage, your fibreglass pool shell will need to rest on a layer of bedding material. This is usually a porous material such as crusher dust, or an aggregate material no larger than 7mm. We will provide you with a copy of the Australian Standards 1838:2021 for fibreglass pool installation as part of your DIY pool kit. These Standards are easy to understand and follow during the installation process . The bedding layer does not need to be compacted and you won’t need a concrete slab under your pool.
Watch our How To videos about the type of bedding materials you can use, and how to level the bedding layer.
7. Pool Shell Delivery
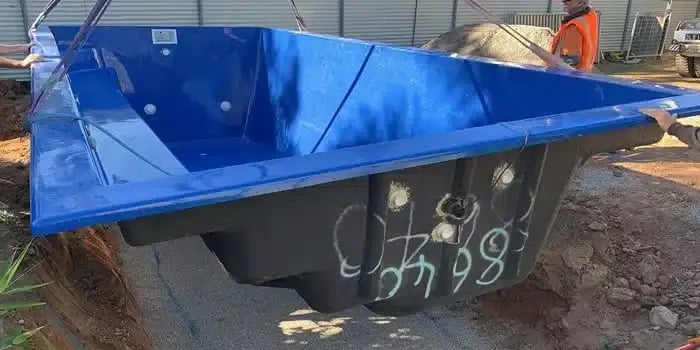
Now it gets exciting. We will arrange the delivery of your DIY fibreglass pool kit to your front kerb. Click here to see where we deliver across Australia. You can have your fibreglass pool placed onto your front verge for installation at a later date. Or (if needed), you can organise a crane to lift your fibreglass pool shell over your house and lower it into place. If you have powerlines and/or a two-storey house in the way, it is not a problem – arrange a bigger crane! The cost to hire a crane is usually between $500 and $1,500.
If you have a challenging site and are having trouble finding a crane company, give us a call. We can usually point you in the right direction. If your pool delivery needs to be delayed, no problem. You won’t end up with a pool on your driveway for months. We can store the pool for you or delay its manufacture date.
8. Plumbing and Connections
Once your fibreglass pool shell is resting in place, it’s time to plumb up. The return jets (sometimes called eyeballs), skimmer box and any other plumbing provisions (such as spa jets, deck jets and heating), will need to be connected with plastic Class 9 PVC plumbing and two-part pressure glue. You generally use 50mm plumbing from the skimmer box to the pump, all other connections are 40mm. We recommend pressure testing all your plumbing connections for leaks before backfilling.
To assist with managing groundwater levels, you’ll need to install a 100mm PVC standpipe in conjunction with a hydrostatic valve in the floor of your DIY fibreglass pool.
Watch previews of our DIY Pool videos showing the installation of the fittings and hydrostatic valve
Live in WA? You don’t need to install a hydrostatic valve.
9. Backfill and Level
Backfilling is a nice way to say “fill in the hole” around your fibreglass pool shell. To ensure longevity, your will need to backfill around your pool using cement-stabilised crusher dust. This prevents the backfill from being eroded by groundwater or future pool movement. You will need to slowly fill your pool with water during this process. This ensures that once full, it is level and the pool walls straight. You’ll need to install temporary pool fencing while your pool is being filled and has more than 300mm of water in it.
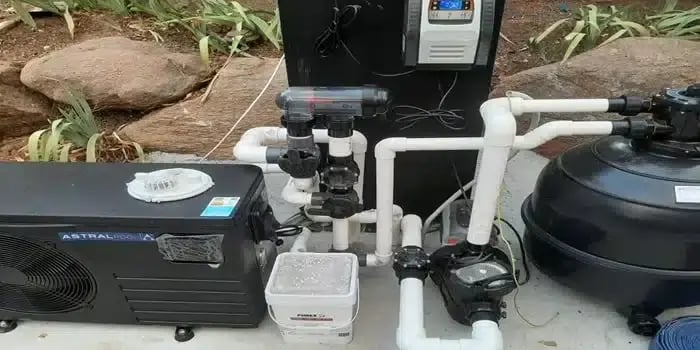
In this image, the plumbing on the left side of the pool is for the water feature, pump, filter and chlorinator.
Watch our DIY video showing you how to backfill and level a fibreglass pool
10. Concrete Bond Beam
You will need to lay a beam of concrete around your entire DIY fibreglass pool. This concrete has to be reinforced with steel bar and/or mesh and physically tied to the underside of the pool edge (called coping) to prevent separation. Concrete is worked under the coping and grips the steel bar as it dries for strength. The coping is 200mm wide and provides a structurally strong foundation for your DIY fibreglass pool edge tiling (called coping tiling). If your tiles are longer than 300mm, you can increase the width of your bond beam to the size of your tiles.
Watch our DIY pool videos showing you how to install a bond beam
*A BOND BEAM IS NOT REQUIRED IN WESTERN AUSTRALIA
11. Coping Tiles and Filtration
Your bond beam will reach 90% of its final strength within 7 days, which means you can then lay your coping tiles. The next step is to install and test your pool equipment. Once this is up and running, you have completed your basic fibreglass pool installation.
The last pieces of the puzzle – pool fencing, cleaning and balancing the water, landscaping and further paving – can be completed by your installer. Or you can arrange these trades yourself to save more money. Our water features are designed to neatly house your pump, filter and chlorinator as seen in this image.
All you need to do now is tell the kids to get their bathers on!
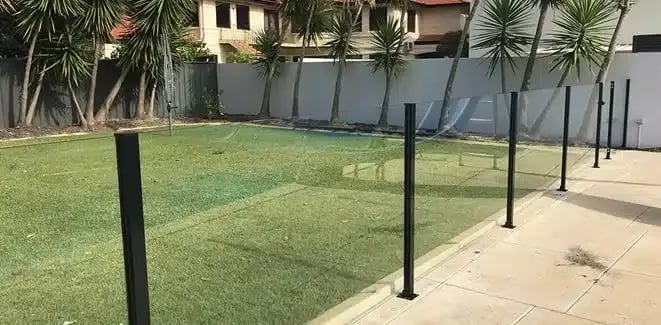
12. Making Your Pool Safe
Most pool owners surround their fibreglass pool with paving or poured concrete (you can use exposed aggregate or honed). This also enables you to install permanent pool fencing that is compliant with Australian Standards. Your pool fence installation company will be able to guide you on the requirements.
13. Final Certification and Landscaping
Once your permanent pool fencing has been installed, you need to arrange for your fibreglass pool to be inspected and certified as compliant. Your local council or your private certifier will sign off on this. Landscaping doesn’t need to be completed for certification. You have plenty of time to work out your landscaping plan to make your pool the envy of the street.
14. No More Summer Melting
You’re done! It’s time to start creating awesome pool-time memories with friends and family and staying cool. Nope, it’s not weird to start wishing for belting hot weather once you have a pool!

Have Questions About Pools, Equipment and Costs?
Our “Essentials You Must Know Before Buying A Pool” e-guide answers your questions about pool sizes, pumps, filters, chlorinators, heating and cleaning options including what they cost
Not you? Click here to reset